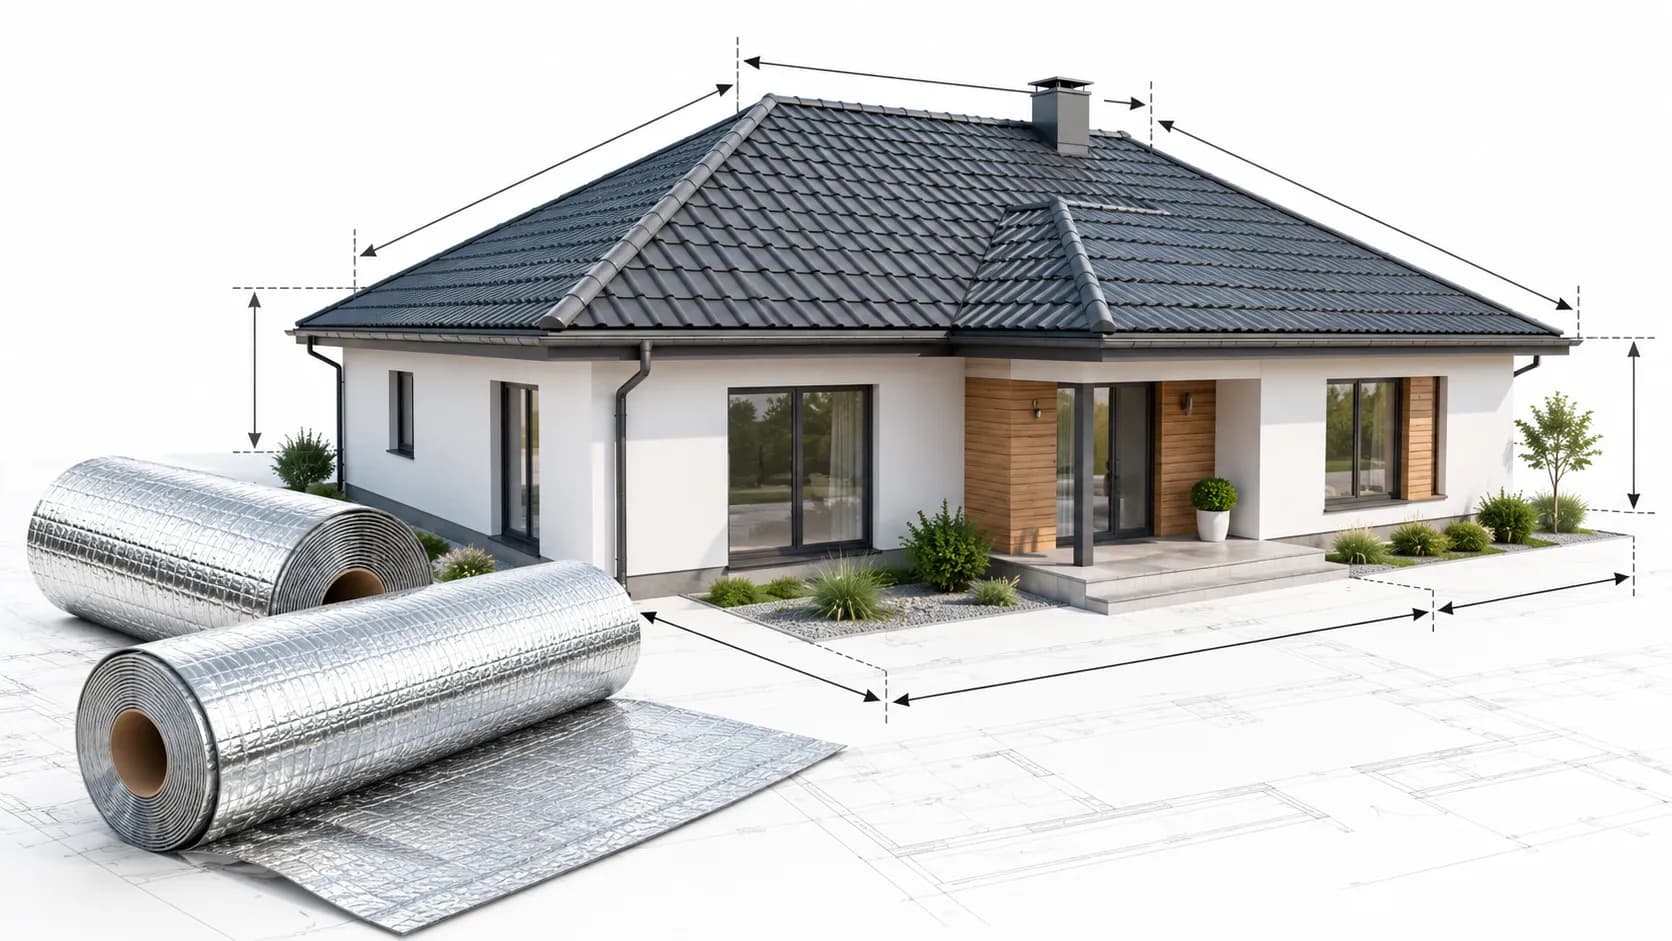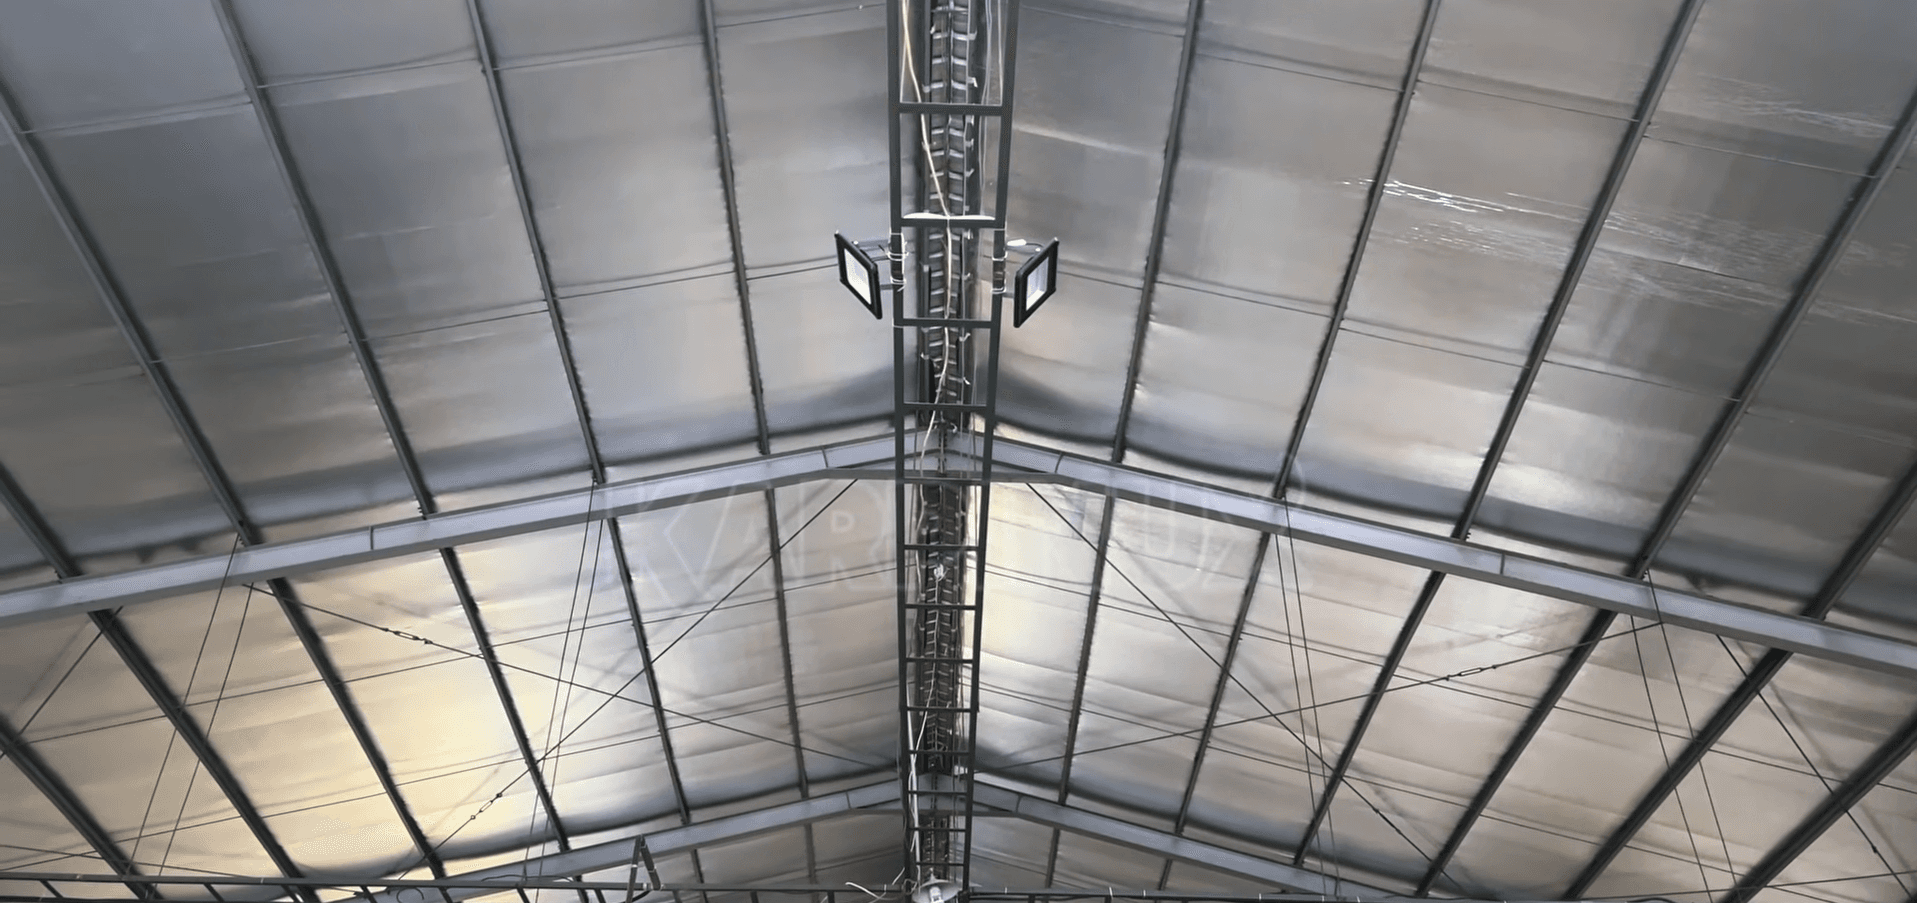
Installing roof insulation involves more than simply laying the material beneath the roof covering. The position of the layers, the direction of the aluminum foil, the quality of the joints, and the presence of an air gap can all affect the installation results.
In buildings with spandek and galvalume roofing, insulation is used to help reduce heat transfer from the roof surface into the space below.
However, the installation method for spandek roof insulation must be adapted to the building structure and the characteristics of the material used. Improper installation can reduce insulation effectiveness and cause problems such as condensation or open joints.
This article discusses the stages of roof insulation installation, from determining the correct position and understanding the function of an air gap to inspecting the finished installation.
Why Is Proper Roof Insulation Installation Important?
Spandek and galvalume are types of metal roofing commonly used in houses, warehouses, workshops, and industrial buildings.
When exposed to sunlight, the roof surface absorbs heat energy, which can then transfer into the building.
This heat transfer occurs through three main mechanisms: conduction, radiation, and convection.
Roof insulation is used to help slow down this heat transfer. However, each type of insulation material works differently.
For example, XLPE foam helps resist heat flow through its material structure, while aluminum foil helps reduce heat transfer through radiation when facing an air space.
As a result, two buildings using similar insulation products may not achieve the same results if their installation methods differ.
Installation quality is part of the overall performance of an insulation system, not simply a matter of how neatly the work is carried out.
Understanding the Structure of Spandek and Galvalume Roofing
Before starting the installation, it is important to understand the structure of the roof.
In general, a metal roofing system consists of several components, including the roof covering, battens or purlins, main roof framing, the space beneath the roof, and a ceiling if one is installed.
Insulation can be placed in different positions depending on the type of building and the installation method.
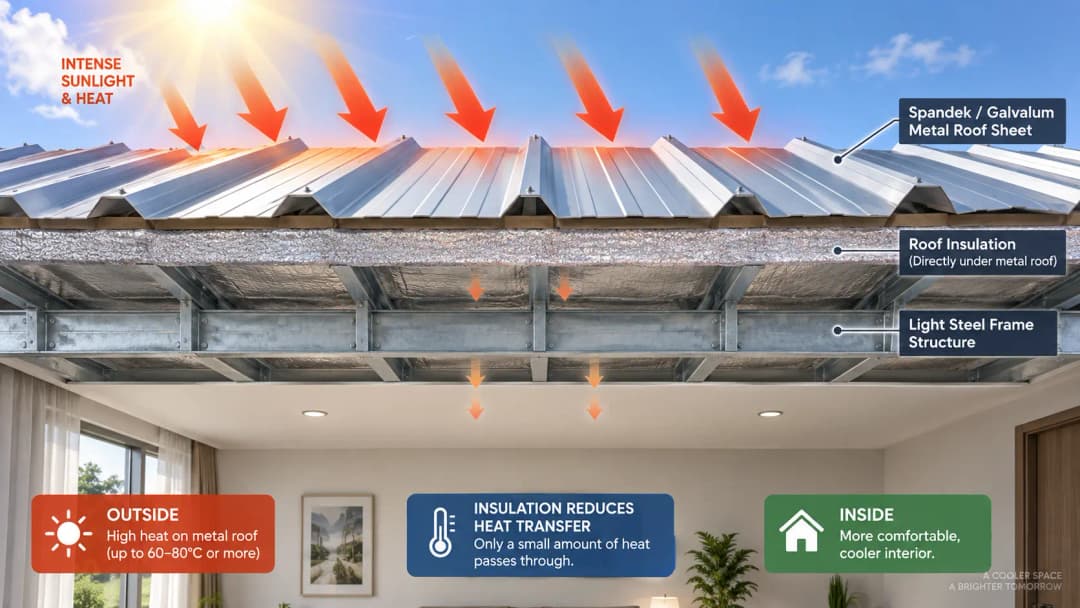
There are two material functions that need to be distinguished within this system.
The foam layer helps slow down heat transfer through solid materials. Meanwhile, the aluminum foil layer acts as a reflective surface with low emissivity.
The combination of these two materials is used in products such as Karpinux Roof Insulation, which is made from XLPE foam and aluminum foil.
However, the presence of both layers does not automatically guarantee optimal performance. The relationship between the foil, air space, framing, and roof covering must still be considered.
Insulation Position: Beneath the Roof or Above the Framing?
One of the questions when installing roof insulation is determining the material's position relative to the framing and roof covering.
In metal roof construction, there are two commonly considered approaches.
Installation Between the Roof Covering and Framing
This method is generally planned before the roof covering has been installed.
The insulation is positioned as part of the construction system beneath the metal roofing sheets, with fastening methods and air spaces adjusted according to the design.
One advantage of this approach is that the installation area is relatively easy to access during construction.
However, the material should not be clamped or compressed without proper consideration, especially if the system requires an air gap for its reflective function.
Installation Beneath the Roof Framing
For buildings where the roof has already been installed, insulation may be installed from beneath the roof structure.
The material is spread out along the roof plane and secured using an appropriate support or fastening system.
This method allows the work to be carried out without necessarily removing the entire roof covering.
However, the installation must take into account the condition of the framing, fastening points, electrical installations, ventilation, and working access.
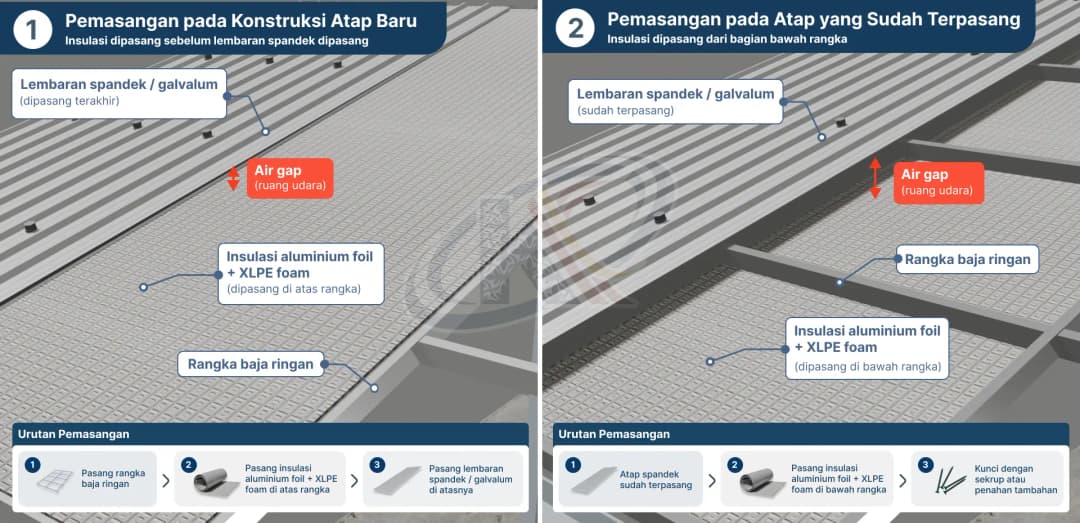
There is no single position that is automatically the most suitable for every building. The choice must consider the product type, structural details, moisture control, and the manufacturer's installation instructions.
Aluminum Foil Direction: Facing the Roof or the Interior?
The next question concerns the direction of the aluminum foil surface.
Many people assume that the shiny foil surface must always face the roof covering to reflect heat from the sun.
However, the working principle of reflective insulation is not that simple.
The aluminum foil surface helps reduce heat transfer through radiation because it has high reflectivity and low emissivity.
For this function to work effectively, the reflective surface needs to face an air space rather than being completely sandwiched directly between solid materials.
What About Single-Sided Insulation?
In single-sided insulation, only one side has a reflective surface, depending on the product configuration.
The installation orientation must be selected based on the location of the air space specifically designed to take advantage of that reflective function.
The foil surface may face an air cavity above or below the insulation, depending on the roof system design, moisture control requirements, and the manufacturer's recommendations.
Therefore, it is not accurate to establish a universal rule that the foil must always face upward or downward for every type of construction.
What About Double-Sided Insulation?
Double-sided insulation has reflective surfaces on both sides.
This configuration allows both surfaces to be utilized when each faces an appropriate air space.
Even so, double-sided insulation does not mean that its insulating performance automatically becomes twice as high as single-sided insulation.
Another important consideration is the position of the layer that controls water vapor movement. In air-conditioned buildings, warehouses with high humidity, or regions with hot and humid climates, foil orientation and condensation control must be determined as part of the overall system rather than solely based on the direction of incoming heat.
Air Gap: Why Should Air Space Not Be Overlooked?
An air gap is an air space located between material layers within a roof structure.
In reflective insulation systems, this air space plays an important role because it allows the reflective surface to reduce heat transfer through radiation.
When aluminum foil comes into direct contact with another material surface without an air space, its reflective contribution is not the same as when the foil faces an air gap.
How Much Air Gap Is Needed?
The required air gap is not always the same for every product.
As a general reference, Australian government guidance on reflective insulation mentions a still air space of at least approximately 20 mm next to the reflective surface for the systems described in that guidance.
However, this figure is not a universal minimum specification for every type of insulation or a specific requirement for Karpinux.
Actual requirements must follow the product configuration, system performance testing, roof conditions, and building design.
Air Gaps and Ventilation Are Not the Same
It is important to distinguish between an air gap and ventilation.
An air gap is a planned air space within the arrangement of materials. Ventilation is a system that allows air exchange to help remove heat or control moisture.
A cavity may be designed as a still air space or a ventilated cavity, and each has different thermal characteristics.
In metal roofing, condensation control is also a concern because differences in temperature and water vapor content can cause moisture to form on certain surfaces.
Therefore, air cavities should not be created or closed off without considering ventilation and drying pathways.
Preparing Tools and Materials Before Installation
Proper preparation helps ensure that the work is more accurately planned and minimizes material waste.
Common tools that can be prepared include measuring tapes, cutting tools, marking tools, joint tape compatible with the product, and fastening or support systems suitable for the construction.
In addition, appropriate safety equipment is required for working at heights.
Before installation, inspect the condition of the roof covering, framing, electrical installations, ventilation pathways, and potential leaks.
Do not use insulation material to cover roof leaks that have not been repaired.
Calculating Insulation Requirements
Material requirements are calculated based on the surface area of the roof that will be insulated, not merely the building's floor area.
For example, Karpinux Roof Insulation is available in rolls measuring 1 × 25 meters, giving each roll a nominal coverage area of 25 m².
The estimated number of rolls can be calculated using the following formula.
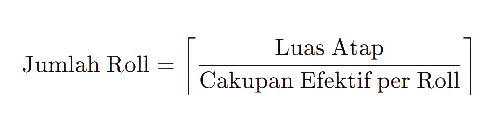
Effective coverage may be smaller than the nominal area due to overlapping joints, cutting, and the shape of the roof surface.
As an illustration, a roof measuring 100 m² requires at least 4 rolls based on a nominal coverage of 25 m² per roll. The actual purchase quantity must account for joints and additional material allowances.
Steps for Proper Roof Insulation Installation
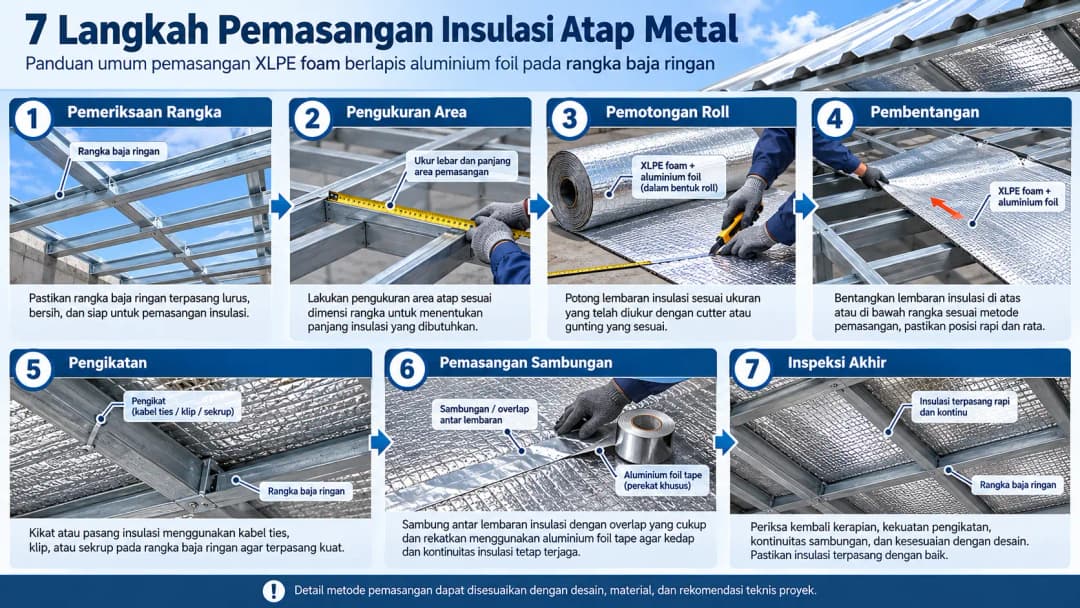
The following are general steps for installing foam-based roof heat insulation with an aluminum foil surface.
These steps serve as a guide for planning and inspecting the work. Details regarding fastening, installation direction, joints, and clearances must still follow the manufacturer's instructions and the construction design.
Step 1 — Inspect the Roof and Framing Conditions
Make sure the roof covering, battens, purlins, and other structural components are in good condition.
Check for leaks, corrosion, damaged framing components, or electrical installations that could potentially come into contact with the foil surface.
Step 2 — Determine the Material Position and Orientation
Select the installation position based on the roofing system being used.
Determine which reflective side will face the air space and check whether special arrangements are needed for moisture control and ventilation.
Step 3 — Measure the Area and Cut the Insulation
Measure the length of the installation area, then cut the material according to the required dimensions.
Allow additional material according to the jointing method so that the sheets do not end up too short or leave gaps.
Step 4 — Install the First Sheet
Spread the material across the planned installation position.
Use a suitable fastening or support system. Avoid excessive tension, large wrinkles, and compression that could damage the foam thickness or close off the required air cavity.
Step 5 — Continue with the Next Sheet
Install the following sheet while maintaining continuity across the insulation surface.
At the joints, pay attention to material alignment to prevent open gaps from forming.
Step 6 — Finish the Joints and Edges
Join the materials using the system recommended by the manufacturer.
If the system requires sealed joints, use joint tape that is compatible with the foil material and the installation environment.
Step 7 — Inspect the Entire Surface
Carry out an inspection of the entire insulation surface.
Pay attention to areas around the framing, roof edges, joints, utility penetrations, and sections near ventilation pathways.
Roofing work, particularly at heights or near electrical installations, should be carried out by competent personnel following appropriate safety procedures.
Jointing Techniques to Prevent Open Gaps
Joints are one of the areas that require attention during roof insulation installation.
Sheets that are not properly joined may leave unintended pathways for heat transfer or airflow.
In certain products, joints may also help maintain the continuity of an air or vapor control layer.
Should Insulation Sheets Overlap or Simply Meet at the Edges?
The jointing method depends on the type of material and the function of the system.
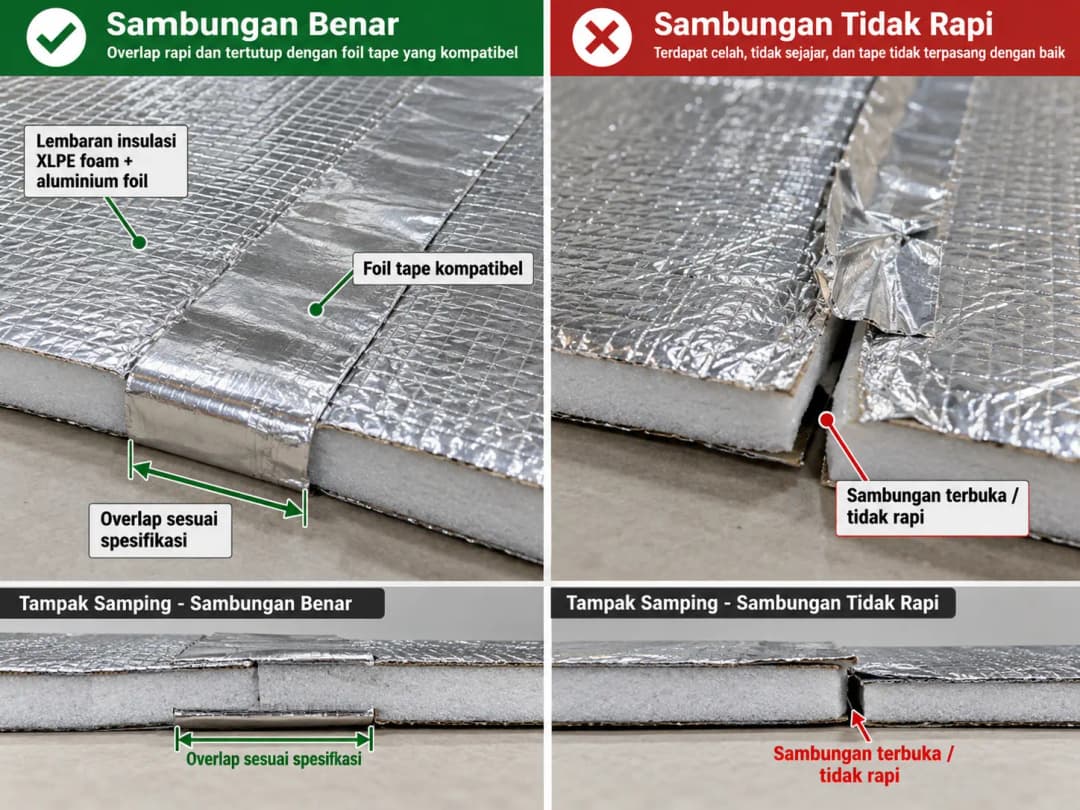
Some products use an overlap method, where the edges of two sheets overlap each other.
Other products have specific joint details or use connecting tape.
The overlap width should not be determined arbitrarily, as the jointing requirements for a conventional radiant barrier may differ from those of an insulation system that also functions as a vapor control layer.
Is Aluminum Foil Tape Necessary for the Joints?
Foil tape can be used in systems that require sealed joints, provided it is compatible with the insulation material.
It must be applied to a clean surface under conditions that comply with the adhesive product's requirements.
Make sure the tape adheres along the entire joint and does not detach easily.
However, not every type of radiant barrier uses an airtight jointing system. Therefore, tape requirements must refer to the function of the layer and the technical details of the product being installed.
Installation on New Roofs vs. Roof Renovations
Installation methods for new buildings may differ from those used when installing insulation in buildings that are already in use.
| Aspect | New Roof | Roof Renovation |
|---|---|---|
| Work access | Easier during construction | Depends on the space beneath the roof |
| Position selection | Can be planned from the beginning | Must follow the existing structure |
| Air gap | Can be integrated into the design | Requires inspection of the actual available space |
| Joints | Easier to plan | May be obstructed by framing or utilities |
| Challenges | Coordination with roof installation | Access, safety, and existing conditions |
In new construction, insulation planning can be carried out alongside the selection of framing and roof covering materials.
In renovation projects, inspecting the condition of the existing structure becomes an important initial step.
If the available installation space is very limited, the thickness and configuration of the material must be carefully considered to prevent the insulation from interfering with other components.
Common Roof Insulation Installation Mistakes
Although insulation materials are relatively flexible, several mistakes should be avoided.
1. The Foil Surface Does Not Face an Air Space
Installing the reflective surface directly between solid materials can eliminate the benefits that an air gap provides to reflective performance.
2. Joints Do Not Follow the System Details
Open joints or joints that do not meet specifications can disrupt insulation continuity and the function of air or vapor control layers.
3. Ignoring Condensation
Water formed through condensation does not always originate from leaks in the roof covering.
Foil orientation, ventilation, and the structure's ability to dry must be considered, particularly in buildings with high humidity.
4. Installing Insulation Without Proper Support
Material that is not properly supported may sag excessively or shift out of position.
The fastening system must be suitable for the material's characteristics, framing spacing, and operating conditions.
5. Blocking Ventilation Pathways
Closing off airflow pathways intentionally designed into the roof structure can increase the risk of heat and moisture buildup.
6. Treating Insulation as a Replacement for Waterproofing
Although some foam materials have low water absorption, insulation cannot automatically replace the roof's waterproofing system.
Leaks must be addressed at their source.
How to Inspect the Finished Installation
After the work is completed, the installation results should be inspected before being declared ready for use.
The inspection should cover layer continuity, fastening strength, joint quality, air gap conditions, and any possible interference with ventilation.
Roof Insulation Inspection Checklist
Check off each item that has been inspected on-site.
Inspection Progress
The insulation surface has been installed according to the plan
Foil orientation matches the system design
Joints have been completed according to specifications
Air gaps are not blocked or compressed
The material is secured with appropriate fasteners
Ventilation and drainage pathways remain functional
There is no hazardous contact with electrical installations
Areas with potential leaks and condensation have been inspected
Visual inspection is an initial step. For industrial buildings or large-scale projects, the installation results must also be evaluated against the project's technical requirements and design specifications.
FAQ: Frequently Asked Questions About Roof Insulation Installation
Can roof insulation be installed directly against spandek roofing?
Some insulation systems are designed for direct contact with the roof covering. However, if the system relies on a reflective surface facing an air space, installation without an air gap may reduce its reflective function. Follow the configuration specified for the product being used.
Must aluminum foil always face upward?
Not necessarily. Aluminum foil orientation must follow the location of the air space and the moisture control design. Therefore, the installation direction for single-sided insulation cannot be generalized across all types of buildings.
What Is the Ideal Air Gap for Roof Insulation?
The requirement depends on the system. General references for reflective insulation mention an air space of approximately 20 mm or more for certain configurations, but the actual design and product specifications remain the primary reference.
Can roof insulation be installed without removing the roof?
It may be possible if access is available from below and the structure allows safe installation. The condition of the framing, electrical installations, ventilation, and support methods must be inspected first.
Is foil tape mandatory for insulation joints?
Not for every system. In construction systems requiring airtight joints or vapor control, suitable tape may be an important component. For other types, follow the jointing method specified in the manufacturer's instructions.
Does Thicker Insulation Always Mean Better Performance?
For materials with the same thermal characteristics, increasing thickness generally improves resistance to heat flow through the material. However, overall performance is still influenced by roof conditions, air gaps, ventilation, and installation quality.
Conclusion: Proper Installation for More Optimal Performance
Installing insulation on spandek and galvalume roofs involves more than simply spreading material beneath the metal roofing sheets.
The material position, aluminum foil orientation, presence of air gaps, joint quality, and ventilation conditions must be planned as one complete system.
Foam-based insulation with a reflective layer can provide two different heat control mechanisms. The foam helps resist heat flow through the material, while the aluminum foil helps reduce heat transfer through radiation.
One product that uses this combination is Karpinux Roof Insulation from PT Karya Pilar Nusantara.
Karpinux is available in thickness options of 5 mm, 8 mm, and 10 mm, with single-sided and double-sided configurations to accommodate different construction requirements.
Ultimately, selecting the right material must be followed by the proper installation method. By considering the entire roof structure, insulation can perform according to its intended function.